by administrador | May 16, 2018 | Crear un Radar de Competencias 360º paso a paso - Create a 360º Competencies Radar step by step
You can export all radar valuations to excel.
In any Competency Radar Project you will see a button called “Group Data”, when you click on it, a window will be displayed with the option to generate a report in excel.

The system will download an excel with those evaluated that have generated report.

by administrador | Apr 23, 2018 | Crear un Radar de Competencias 360º paso a paso - Create a 360º Competencies Radar step by step
A Competency Radar project can be re-evaluated twice at any time.
Before creating a re-evaluation of a project, you must take two things into account:
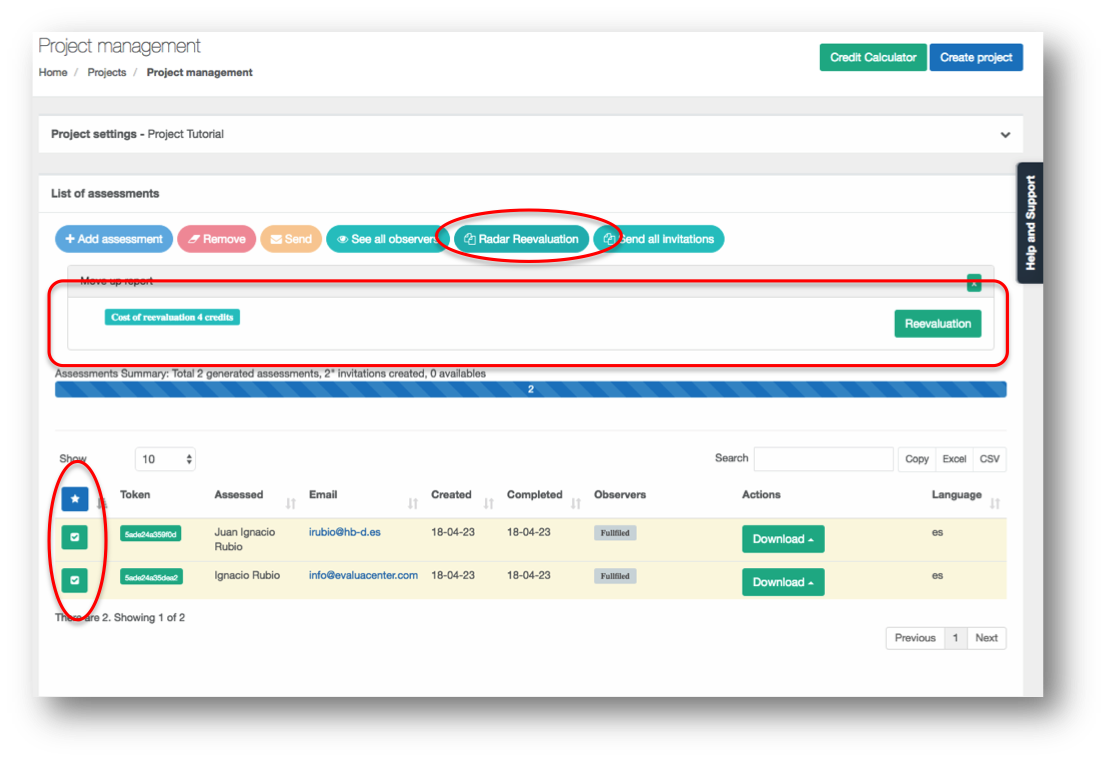
- In order to re-evaluate a project, it must be complete (all reports generated), otherwise the Re-evaluation button will not be activated.
- You must have credits enough (2 credits per evaluated to reevaluate). If you do not have enough credits you must acquire the number of credits required in the credit calculator.
To begin, open the project you want to re-evaluate. You can re-evaluate all the people or only some. Note that if you re-evaluate only some, the others that are not re-evaluated can no longer be re-evaluated, because once a re-evaluation of a project has been carried out, it can no longer be re-evaluated.
We select the people that we want to evaluate with the blue button on the left so that it changes to green (if you re-evaluate all of them, you can press the blue star button to select all people al the same time. Clicking on the re-evaluation button will create a project with the same name as the original but adding “First reevaluation (date).” All the assessed will have the same observers they had in the original project.
 You have to take into account the following:
- The new reassessment project does not automatically send the invitations, this is done so that you can adjust the assessed and observers of this re-evaluation before invitations are issued. If you do not have to modify anything or have already done it, you will see that there is a button that says: “Send all the invitations”. By clicking directly on it, you will send both the invitations to the assessed and the observers (keep in mind that if there are people who have more than one invitation, because for example they evaluate several ones and at the same time they are evaluated, they will only receive one invitation, upon entering that invitation they will see all their pending tests).
How to vary data in re-evaluations.
Delete or add observers or add new assessed is always done once the reassessment project is created.
If, for example, we want to delete an observer (because he is no longer in the company), we must do it now in the reassessment project and before sending the invitations, press the “Observers” button to see the observers of a particular assessed , or click on the button “See all the observers” to display all the observers and delete them (keep in mind that an assessed person must have at least one observer.
We can also add observers, and even add new assessed (who obviously will not have past data in the report). To add a new assessed, we must expand the evaluations assigned to the project (see the section “Manage Assessed” point 4. Project edition, increase or decrease evaluations, at this tutorials. Note that a new evaluation has a cost of 5 credits and that you must have enough credits in advance.
What will the assessed and observers see in the new test?
In order to re-evaluate something, we have to be aware of the valuation we gave the first time. That is why in each re-evaluation the assessed and observers will see the valuation that they gave in the previous test, since the system marks in red said valuation. In this way, you can evaluate again with the previous reference.
How many re-evaluations can be made?
A project can be re-evaluated twice. The first re-evaluation will be done and will take the data from the original project, and that first re-evaluation project can be reevaluated once again in such a way that the data from the first re-evaluation will betaken. If in a first or second re-evaluation we have added a new assesseds, these and only these can be re-evaluated again up to a total of two times.
The second re-evaluation of a project works the same as the first.
by administrador | Jun 17, 2017 | Crear un Radar de Competencias 360º paso a paso - Create a 360º Competencies Radar step by step
En su proyecto verá una tabla con todos los evaluados, para cada evaluado verá un botón verde llamado “Evaluadores”

Oprimiendo ese botón le mostrará a los evaluadores que fueron asignados a este evaluado. Si necesita cambiar uno de esos evaluadores (siempre que no hayan hecho el test) puede “Reasignar” la evaluación metiendo el email del nuevo evaluador, también puede borrar a un evaluador que no haya cumplimentado el test, tenga en cuenta que si lo borra no podrá añadir otro. Tenga presente que un evaluado debe quedarse con al menos un evaluador, o el informe no se generará correctamente.

 Usted puede saber que el evaluado ha terminado su propia autoevaluación cuando vea la fecha de finalización en la columna de “Finalizado”. Si aún así no aparece el botón de descarga del informe puede ser porque hay evaluadores que no han completado el test. A la vez usted puede saber si todos los evaluadores (observadores) han terminado el test porque en la columna de “Evaluadores” aparecerá la etiqueta “Completadas”. Cuando tanto evaluado como evaluadores completen los test aparecerá el botón de descarga del informe. Tenga en cuenta que en proyectos de Radar con competencias creadas por usted el idioma de sus competencias en el informe saldrá en el que fueron creadas independientemente del idioma de descarga que utilice.
by administrador | Jun 17, 2017 | Crear un Radar de Competencias 360º paso a paso - Create a 360º Competencies Radar step by step
Start by creating an evaluation project as explained in the article “Creating an Evaluation Project“. Consider the types of Radars:
- Individual Radar: The person being evaluated only evaluates him/herself.
- Cross Radar: All those assessed evaluate all those assessed, without distinction, the system automatically converts each one assessed into an evaluator of the others. Keep in mind that this option is for small teams (we recommend up to 6 or 8 people, although they can be more), because if for example, you have a team of 10 people, each person will have to evaluate 9, which can be tedious
- Open Radar: It is the classic 360º with external evaluators (or observers) in which we assign one or several evaluators to each one evaluated.
Once you confirm the creation of the project the system will take you to a screen with two sections, “Radar Settings” and “Radar Competencies” that does not appear when we create another type of project other than radar.

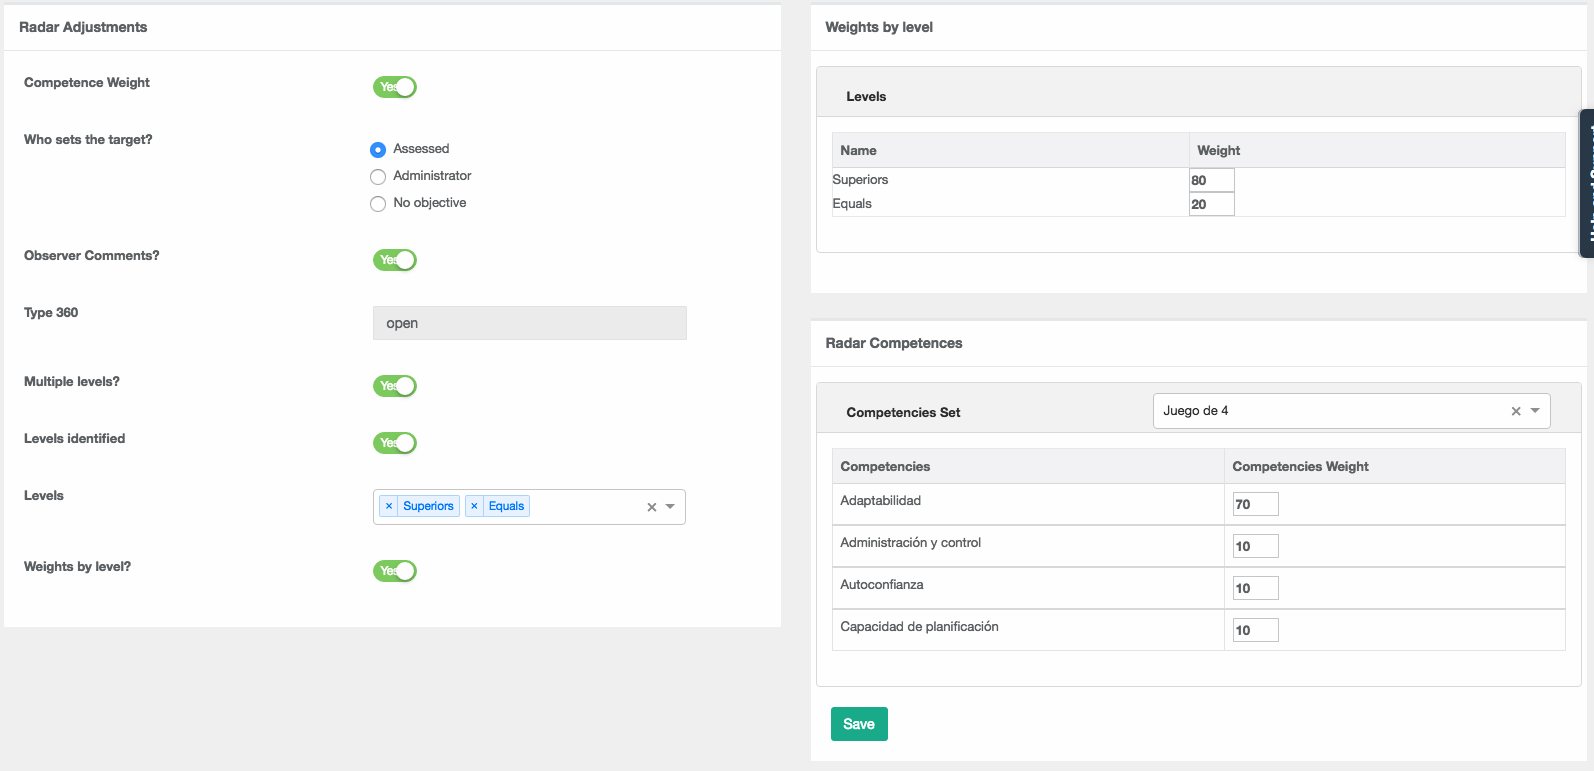
Radar Adjustments
On the Simple and Cross Radars you will only see the “Competencies Weights” and “Who sets the target?” options. On open radars, in addition to the above, you will see other settings. Here’s what each radar project setting option does:
- Weight of Competencies: Allows you to put weight to the competencies that have an impact on the total final score of the person evaluated. When we choose “with weight”, when we load the set of competences we will see a column in which we can establish the weight for each competency, the total of weights must add 100 .
- Who sets the target?: If we choose “The person being evaluated”, it will be this person who establishes it at the test. If we choose the “Administrator”, it will be the creator of the project who can establish the expected objective for each competency, by default the objective will be 100%. You also can choose not to have a target
- Multiple levels?: Allows observers to be differentiated by categories or levels.
- Identified levels: Allows observers to be grouped by categories or levels or by number.
- Levels: Choosing identified levels allows you to choose different levels, choosing unidentified levels allows you to choose the number of numbered levels.
- Weight by level?: Allows different weights to be given to the levels or categories of observers that affect the total final score of the person evaluated.
Radar Competencies
In this section you assign a “competencies set” to your project, the system will show you a list of predefined sets as well as your own competencies sets, when you select one you will be shown the competencies with two possibilities:
- If you chose to give “weight” to the competencies you will see a column to set the weight, which should add 100
- If you chose to have the administrator set the goal, you will see a column in which you can set it, by default it will be 100 for each competency, you can set a different weight for different competencies without having to add any total amount
If you wish to assign a different set, simply press the “x” next to the title of the displayed competency set to “deselect” it.
Once you have finished configuring the options of the project press the “Save” button, this will take you to a new screen in which you can introduce the evaluated ones.
Create Radar Invitations
In Individual and Cross Radar projects you will see a dialog where you can enter the name, surname and email address of those evaluated. In the case of Group Radar, it is not necessary to introduce the observers, since the system will turn each evaluated into an observer of the others (cross radar image).

In Open Radar projects, you will see a window in which, in addition to entering the name, surname and email address of the person being evaluated, you will have to enter the email address of the evaluators (observers) according to the levels or categories you have chosen, which you will see in columns. You will be able to create as many evaluators as you established when you created the project. In the platform, we show you an example of how to do it.
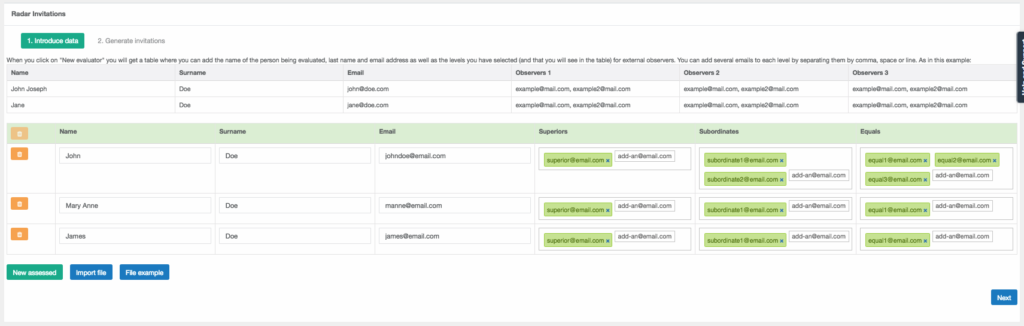
How to import from Excel? Prepare an Excel sheet without column headers or titles. In the first column put the name of the person being evaluated, in the second column the last name, in the third column the email of the person being evaluated, and then a column for each level or category, within each cell of the levels you can put an email or several separated by a comma. We will match the evaluators (observers) in their correct column as shown in the data entry table. In this case, we would know that in the Excel 4 column in each cell are the emails of the “Subordinate” level evaluators and in the Excel 5 column should be the “Equals”. If we had chosen more levels, or different or in a different order, the Excel to import should always reflect that structure, which we can see in the table of data entry.
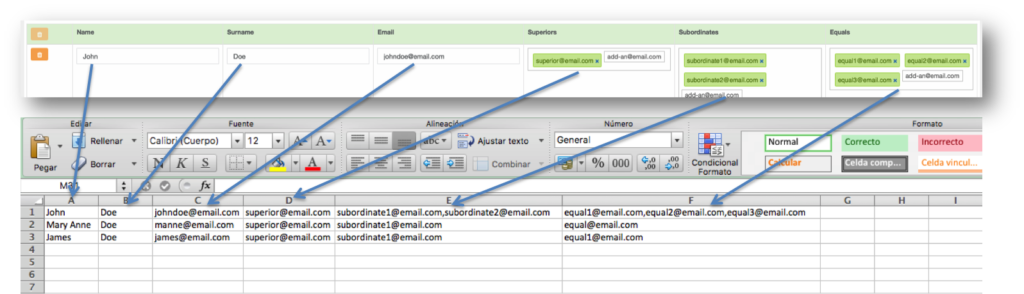
Once entered the information of the evaluated and evaluators we press the “Next” button and the system will take us to the confirmation page where we can choose if the system automatically sends invitations (or we send them manually later) as well as the language of the emails. When you press the “Generate” button, the system will take you to the “Project Management” screen where you will see our evaluators and their evaluators (observers).
by administrador | Jun 17, 2017 | Crear un Radar de Competencias 360º paso a paso - Create a 360º Competencies Radar step by step
 En el menú de “Juegos de competencias” encontramos dos secciones:
- Diccionario de juegos de competencias predefinidas”
- Mi diccionario de juegos de competencias”
Ambas secciones se puede “plegar” y “desplegar” usando la flechita que encuentra a la derecha de cada una de las secciones como sucedía con el Diccionario de Competencias.
Juegos de competencias predefinidas
Estos juegos de competencias están predefinidos en el sistema y coinciden con las competencias que encontramos en los “módulos de competencias conductuales” de la evaluación DISC. Tenga presente que los “módulos de competencias conductuales” del DISC NO miden el desempeño de las competencias sino la disposición natural a su desarrollo. Usted podrá seleccionar estos juegos de competencias cuando cree un proyecto de Radar de Competencias.
Mi Diccionario de Juegos de Competencias
Como hemos visto anteriormente también puede crear su propio juego desde el “Diccionario de competencias”. Sus juegos de competencias estarán disponibles para usarlos cuando cree un proyecto de Radar de Competencias